Contents
- Git
- Visual Studio Code
- Pawn Tools for VSCode
- sampctl and Scoop
- GitHub account and a personal access token
- MySQL
- Creating and building a new package
- Dependencies (includes and plugins)
Git
What is Git?
In a nutshell, Git (not to be confused with GitHub) is a version control system that allows you to track changes in your code. It makes it very easy to go back to an earlier, working version of your code in case you screw up (and you're going to screw up at some point, trust me). Git is also a requirement for sampctl, but more on that later.
Installing Git
Assuming you are using Windows, download the Git Setup from the official website, and open it. You don't have to worry about changing any options in here; the defaults are okay. Simply keep clicking next until the installation is complete.
Visual Studio Code
What is Visual Studio Code?
Visual Studio Code, or VSCode for short, is a powerful text editor favored by a lot of people in the SA-MP scripting community. It provides easy integration with community created tools such as sampctl or the improved community compiler.
Installing VSCode
You can download VSCode from the official website: https://code.visualstudio.com/
Pawn Tools for VSCode
What is or are Pawn Tools?
In order to be able to use auto-complete and syntax highlighting ins VSCode you will need to install the Pawn Tools extension by Southclaws.
Installing Pawn Tools
In Visual Studio Code, click the Extensions icon in the tools ribbon. Normally it is the fourth icon from the top. Search for "pawn tools" and install the extension created by Southclaws by clicking on it and choosing Install. You may need to reload VSCode for the change to take effect.
sampctl and Scoop
What is sampctl?
sampctl ("SA-MP Control", if you will) is the self-proclaimed Swiss army knife of SA-MP and it is indeed an invaluable tool for speeding up development. It can automatically install libraries ("includes") for you, eliminating the need to hunt down every other thing that it depends on. Sampctl also provides the community compiler, which is an improved version of the default compiler that comes with the server package. It compiles your mode much faster and it fixes some issues in the process.
What is Scoop?
Scoop is a package manager for Windows. We're going to use this tool to automatically install sampctl. It is possible to install sampctl by hand but that method is much more complicated.
Installing scoop
Open a PowerShell window on your computer. Depending on your version of Windows it may simply be called PowerShell or it may be called Windows Terminal. It doesn't matter which one you use, as long as it says "PowerShell" in the console window that opens.
First we'll need to temporarily disable the execution policy so that the install script can run. Type or paste the following command into the console window and press enter:
Set-ExecutionPolicy RemoteSigned -scope CurrentUserNext, install scoop using the following command:
Invoke-Expression (New-Object System.Net.WebClient).DownloadString('https://get.scoop.sh')Scoop is now installed, but don't close the terminal window just yet.
Installing sampctl
Still in the same terminal window, execute the following command to install sampctl:
scoop bucket add southclaws https://github.com/Southclaws/scoops.git; scoop install sampctlsampctl is now installed and you can close the terminal window.
GitHub account and a personal access token
What is GitHub and why do I need to make an account?
GitHub is a website that hosts Git repositories in the cloud. You can also use GitHub to safeguard your own code in the cloud, even privately and for free. The main reason we need to create a GitHub account in this tutorial, however, is to circumvent GitHub's rate limiting: if you download from GitHub a lot without an account you will temporarily be blocked from downloading. This is what sampctl does in the background and getting blocked is clearly annoying.
Creating a personal access token
Once you have created your account, go to your settings: click on your profile picture in the top right corner and choose Settings. Next, click on Developer settings and then on Personal access tokens. Click on the button Generate new token. You will probably need to enter your password again now.
In the Note field, write something descriptive like "sampctl read packages". Set it to never expire, and in the Scope section check the checkbox next to read:packages; that is the only permission that is required. Click on Generate token.
Copy the token (it will start with ghp).
Caution: do not share your personal access token with anyone! It effectively acts like a username/password combination and someone that obtains your token could perform actions in your name.
Adding the personal access token to sampctl
Open a Windows Explorer window, browse to %appdata%\sampctl (copy and paste
this in the address bar) and open config.json. Between the curly braces add a
new line that looks like this:
"github_token": "your_token"Where you replace your_token with the token you copied from GitHub. Save and
close the file. You have now successfully installed and configured sampctl!
MySQL
What is MySQL server?
MySQL (pronounced My Ess Que Ell, not "my sequel") is a relational database management system (RDBMS). In the context of SA-MP it allows for persistent storage of dynamic data for your gamemodes. Think player data, but also vehicles, houses, factions or groups, etc.
Why do I need this?
This step can be skipped if you don't require a MySQL server for your gamemode to function, but since so many gamemodes these days have come to rely on it I felt like I should include it anyway. Do note that MySQL is not a silver bullet that will instantly improve your mode.
A note on XAMPP
XAMPP is an all-in-one package for web developers that contains a MySQL server and a tool to access it. However I find this rather clunky: you need to run a webserver (Apache) to access the MySQL client (phpMyAdmin). The service is often difficult to start for various reasons and it doesn't allow for easy upgrades. phpMyAdmin also isn't the best tool in my opinion.
Installing the MySQL Installer
For this tutorial we're going to use MySQL as a standalone service. Download the installer from mysql.com. At the time of writing there is a web installer (2 megabytes) and a normal installer (470 megabytes), either will work. The web installer will just download the requirements on the fly. When clicking the Download button you will be asked to login or register but you can just skip that: click the link "No thanks, just start my download".
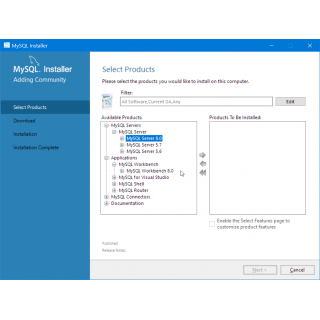
Run the installer you just downloaded. You will be asked what products you want to install. Under the section "MySQL Servers" select "MySQL Server 8.0" and click the right arrow to add it to the "Products To Be Installed" pane. Under the section "Applications" also select MySQL Workbench for installation.
During the installation you will be asked to provide a root (administrator) password. Choose something of your own liking but be sure to remember it because you're going to need it a lot.
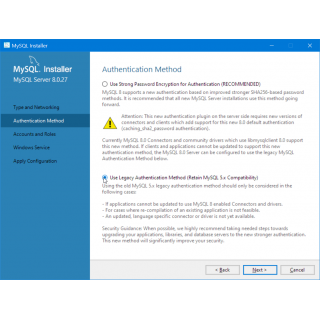
When asked what authentication method you want to use, select legacy. Reason for this is that the MySQL plugin for SA-MP has not been updated yet to make use of the new authentication method.
Accessing the database server with Workbench
To access your database, run MySQL Workbench. In the main window click the little plus icon next to MySQL Connections to add a new connection. The default parameters should point to the local instance so you can just click OK. Optionally you can store the password in the vault so you don't have to type it each time.
Creating and building a new package
Creating a package
As we've finally installed everything is is time to start scripting. Create an empty folder somewhere, this will contain your scripts and the server files. It doesn't really matter where you put, but I'd avoid creating it in "system" directories; documents or desktop would probably be best.
Go into the empty folder you just created, right click on empty space and choose Open in Windows Terminal. If you're on an older version of Windows and you don't see this option then instead hold the shift key while right clicking and choose Open PowerShell window here. You should now have a PowerShell console with the path pointing to your empty folder.
Now type:
sampctl initYou will now be asked a series of questions. For the most part you can just press
enter to use the defaults. When it asks you what text editor you want to use, be
sure to select vscode, sampctl will then automatically add the tasks that are
necessary for the compiler to function.
Once this is done you will notice that your empty folder now contains all the required server files and you're ready to start building your mode!
Building a package
To build (compile) your mode in Visual Studio Code you can press CTRL-Shift-B.
Alternatively, open a new terminal from the Terminal menu and use:
sampctl buildIf you are used to pressing F5 in Pawno then you can add this shortcut to the Run Build Task command in the settings.
Installing dependencies (includes and plugins)
To install additional dependencies for your gamemode from GitHub (includes and plugins) you use the command:
sampctl install UserName/PackageNameFor instance:
sampctl install samp-incognito/samp-streamer-plugin sampctl will then automatically download everything for you and it will add the plugin to the server.cfg.


